How to Jet a Main Sewer Line: From Setup to Clean Pipe
Main sewer lines are the bread and butter of drain cleaning. Every house has one, they all clog eventually, and jetting is the best way to clean them. Here is the complete process from truck to clean pipe.
Before You Start: Assessment
When you arrive at the job, gather information before touching equipment:
- Symptoms: Total backup or slow drains? Multiple fixtures affected? This confirms it is the main line.
- History: Has the line been cleaned before? How often? Previous methods? Recurring problems suggest roots, a belly, or structural issues.
- Cleanout location: Find the main cleanout. Most homes have one near the foundation or at the property line. No cleanout means you are going through a roof vent or pulling a toilet—add that to your quote.
Equipment Setup
Position Your Jetter
Park as close to the cleanout as practical. Less hose between your machine and the pipe means more pressure at the nozzle. Ensure your water supply is connected and tank is full if you are running a tank system.
Select Your Nozzle
For a main sewer line (typically 4-6 inches), start based on what you expect to find:
- Full blockage: Start with a penetrating nozzle to break through, then switch to a flusher for cleaning.
- Roots: Penetrating nozzle first, then a root-cutting nozzle to cut and clear root mass.
- Grease or sludge: Wide-angle flushing nozzle with aggressive rear jets.
- Maintenance cleaning: Standard flushing nozzle handles maintained lines.
If you have a camera, run it first—10 minutes of inspection saves 30 minutes of guessing.
Hose Selection
For main lines, use 3/8-inch or 1/2-inch hose depending on your machine output and pipe size. Larger hose delivers more water but is less flexible in bends. For 4-inch residential mains with sweeping bends, 3/8-inch hose navigates well. For straight runs on larger pipes, 1/2-inch maximizes flow.
The Jetting Process
Step 1: Open the Cleanout Carefully
If the line is backed up, the cleanout may be under pressure. Open it slowly and stand to the side. Sewage under pressure is not something you want in your face. Have a path for water to drain away from the work area.
Step 2: Feed the Hose In
Start water flow, then feed the hose into the cleanout. The nozzle rear jets will propel the hose forward. Guide it in—do not force it. If you hit resistance at a bend, ease back and let the water work the nozzle around the turn. Forcing past bends damages the pipe or gets the hose stuck.
Step 3: Work the Blockage
When you reach the blockage, you will feel the hose stop advancing. Work it back and forth in 2-3 foot strokes. The forward jet (if equipped) attacks the blockage while rear jets clean the pipe behind you.
Watch the cleanout—when the blockage breaks, water will rush past the hose and start draining. This is progress, not completion. Keep working.
Step 4: Full-Length Cleaning
Once through the blockage, advance the hose to the municipal connection or septic tank. This ensures the entire main line gets cleaned, not just the blockage area. Debris pushed downstream needs to exit the system.
Step 5: Retrieve and Re-Clean
Pull the hose back slowly with water running. The rear jets scrub the pipe walls on the way out, giving every section a second cleaning pass. This retrieval pass is where the pipe goes from "flowing" to "clean."
Step 6: Second Pass (When Needed)
For heavily built-up lines, run a second full pass. The first pass removes the bulk. The second pass gets the pipe walls genuinely clean. Time spent on a thorough second pass is time saved on callbacks.
Post-Cleaning Verification
Run a camera to verify the pipe is clean. Show the customer the results. Document the condition of the pipe—note any cracks, offsets, root entry points, or bellies that may cause future issues. This is both quality assurance and a sales opportunity for maintenance plans or repair work.
Common Main Line Challenges
- No cleanout: Install one if the customer agrees—it makes future maintenance dramatically easier and is a billable service.
- Offset joints: Older clay or cast iron pipes often have offset joints where the nozzle can snag. Use a round-profile nozzle and reduce speed through these sections.
- Bellied pipe: Low spots collect debris and water. Jetting clears them temporarily, but the belly will collect again. Be honest with the customer about the limitation and recommend repair.
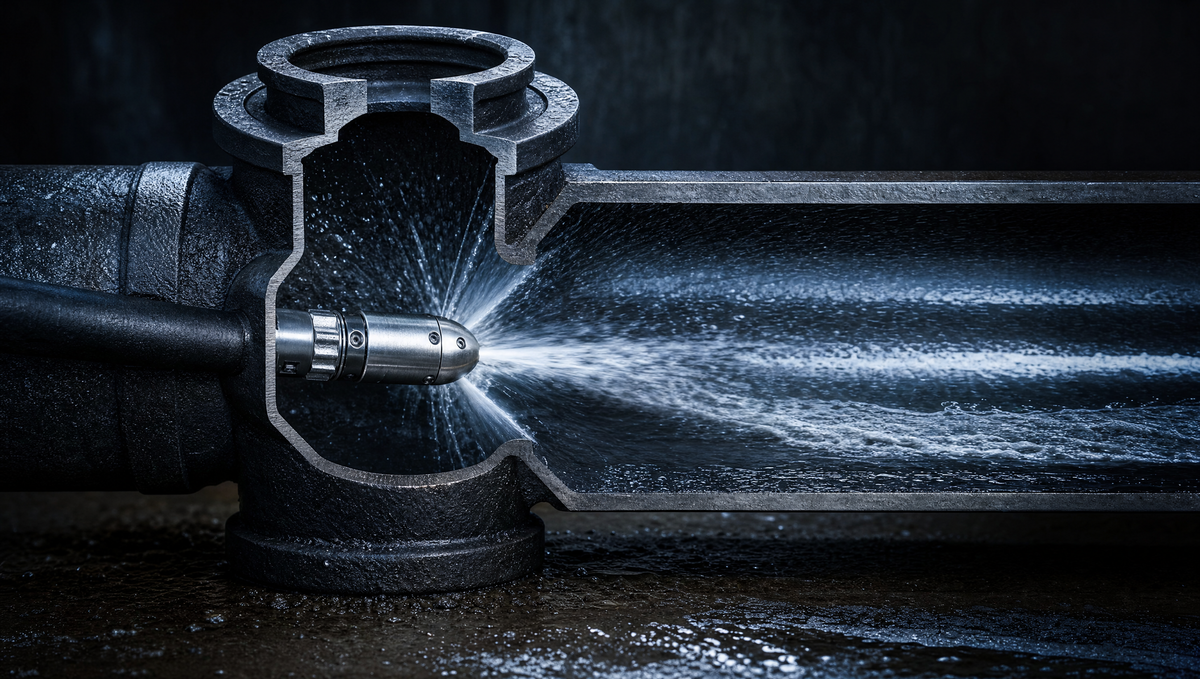
Nozzle Performance Matters
On a 100+ foot main line, your nozzle is doing thousands of dollars worth of work. Professional nozzles with properly sized inserts matched to your machine deliver consistent pressure and coverage from start to finish. Cheap nozzles with worn inserts lose performance over distance, leaving the far end of the pipe poorly cleaned.
Shop nozzles at jetterprosupply.com or call (866) 595-0515.
For 3/4", 1" and 1-1/4" mainline work, see our Contractor & Municipal nozzle collection — large-diameter Victory Line nozzles built for heavy debris and municipal lines.
Put it into practice: Residential Mainline Nozzles — For main sewer lines, these mainline nozzles are the workhorse choice. Questions? Call (864) 804-6637.
Need the right nozzle for the job?
Talk to someone who runs this gear, or shop our full lineup of pro-grade jetting nozzles.