How to Maintain Your Jetter Nozzles (And Make Them Last 10+ Years)
A quality jetter nozzle is a precision instrument. Treated right, a single nozzle body can last a decade or more -- especially when paired with replaceable inserts that protect the body from wear. But even the best equipment fails when it is neglected.
Here is exactly how to maintain your jetter nozzles so they perform like new for years to come.
After Every Job: The 5-Minute Cleanup
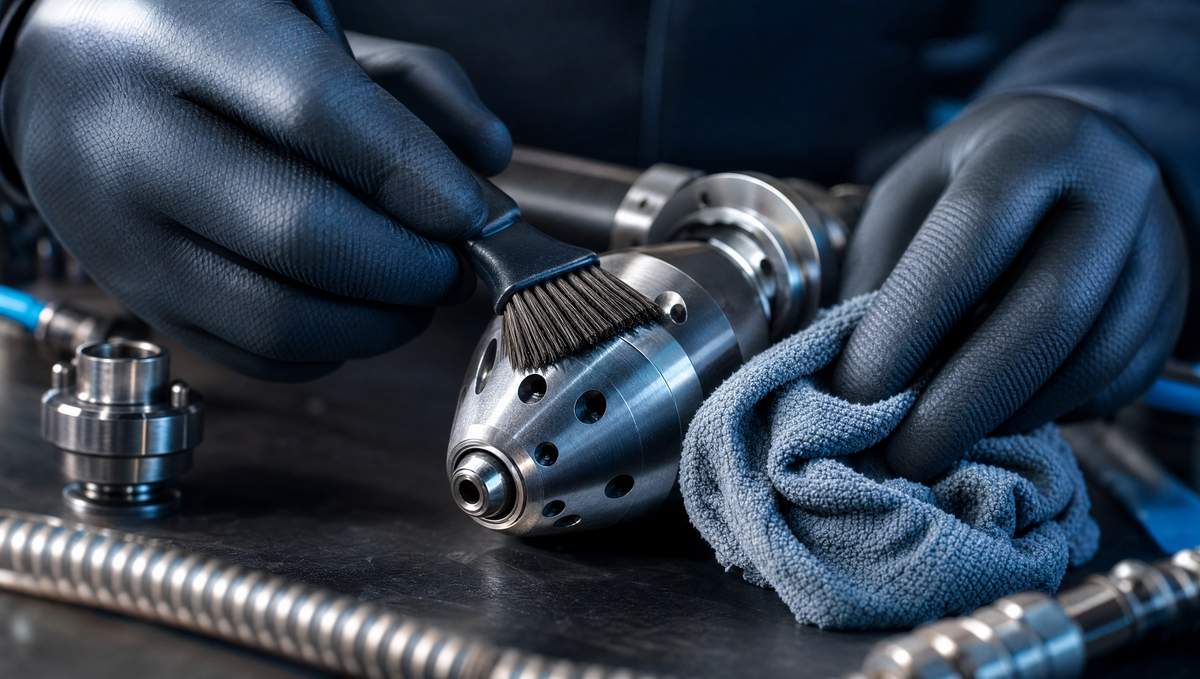
The single most important maintenance habit is what you do in the five minutes after you finish a job. Most nozzle damage happens after the work is done, not during it.
- Flush with clean water: Run clean water through the nozzle for 30-60 seconds to clear any debris, sand, or grit from the internal passages and inserts.
- Visual inspection: Look at each insert orifice. Is it clear? Any visible chips or wear? Catching a damaged insert early prevents poor performance on the next job.
- Clear the jets: Use a soft wire or the cleaning pin that came with your nozzle to clear any debris stuck in the orifice openings. Never use hardened steel tools that could scratch or damage ceramic inserts.
- Wipe down the body: Remove mud, grease, and grime from the nozzle body. This prevents buildup from working its way into threads and connection points.
- Dry before storage: Do not throw wet nozzles into a toolbox. Let them air dry or wipe them down. Standing water promotes corrosion on metal components.
Weekly: Insert Inspection
Once a week (or every 10-15 jobs), give each nozzle a closer look:
- Check insert seating: Make sure each insert is snug and properly seated. Vibration can loosen inserts over time. Hand-tighten any that feel loose.
- Examine spray patterns: Connect the nozzle to your jetter and run it briefly. The spray from each orifice should be a clean, defined stream. A spray that fans out, mists, or looks uneven indicates a worn or damaged insert.
- Look for body wear: Check the nozzle body for dents, gouges, or thread damage. Minor cosmetic wear is normal. Deep gouges or bent geometry means the nozzle has been hitting obstructions hard and may need replacement.
- Check the hose connection: Inspect the threads where the nozzle connects to your hose. Cross-threading or worn threads cause leaks and pressure loss.
When to Replace Inserts
With Tier 3 ceramic inserts from KEG Technologies, replacement intervals are measured in months or years, not weeks. But here are the signs that an insert needs swapping:
- Spray pattern has changed: The stream is wider, weaker, or less defined than when the insert was new
- Visible wear on the orifice: The opening looks larger or uneven
- Flow rate has increased: A worn orifice is a larger orifice, which means more flow at lower pressure -- your jetter works harder and cleans worse
- Job times are increasing: If it takes more passes to clean a similar pipe, your nozzle efficiency has dropped
- Chipping or cracking: Ceramic is extremely hard but can chip from severe impacts. Any visible damage means immediate replacement.
The 2-Minute Swap
Replacing a ceramic insert on a KEG Technologies or Victory Line nozzle takes about 2 minutes:
- Unscrew the old insert (hand-tight or simple wrench)
- Drop in the new ceramic insert ($33–$45)
- Tighten and verify
No special tools. No shop time. You can carry spare inserts in your truck and swap between jobs without missing a beat. That is the entire point of the replaceable insert system -- your nozzle body lasts for years while the consumable inserts are cheap and fast to change.
Storage Best Practices
How you store your nozzles matters more than most plumbers realize:
- Use a dedicated case or roll: Do not throw nozzles loose in a toolbox where they bang against wrenches and fittings. A padded case or tool roll keeps them protected.
- Store dry: Moisture promotes corrosion. If you use a sealed case, make sure nozzles are dry first.
- Protect the threads: Thread damage is the most common storage injury. Use thread protectors or store nozzles so threads are not contacting hard surfaces.
- Keep inserts installed: Do not remove inserts for storage. Empty insert holes collect debris and can get damaged. Leave inserts seated and protected.
- Separate from chemicals: Do not store nozzles next to solvents, acids, or chemical drain cleaners. Fumes and spills can damage seals and finishes.
Seasonal Maintenance
If you live in a climate with cold winters, take extra precautions during freeze season:
- Drain completely: Water trapped in nozzle passages can freeze and crack the body or inserts
- Store indoors: Keep nozzles in a heated space during winter, not in an unheated truck or trailer
- Blow out with compressed air: After the last job of the day in cold weather, blow compressed air through the nozzle to clear any remaining water
The Long Game
A well-maintained nozzle body with replaceable ceramic inserts is a 10+ year investment. The body itself rarely wears out -- it is the inserts that take the punishment. At $33–$45 per ceramic insert with several times the lifespan of steel, your cost per job lands around a dollar.
Compare that to buying disposable nozzles every few months. Maintenance takes minutes; the savings add up to thousands over a career.
Shop replacement ceramic inserts and nozzle accessories at Jetter Pro Supply -- backed by a 5-year warranty, with same-day shipping on inserts.
Put it into practice: Replacement Inserts — Rebuilding with fresh inserts is a big part of making nozzles last for years. Questions? Call (864) 804-6637.
Related: a disposable can't be maintained, only replaced — here's the full cheap-vs-pro nozzle cost breakdown.
Need the right nozzle for the job?
Talk to someone who runs this gear, or shop our full lineup of pro-grade jetting nozzles.